Setting up QT
What you’ll need
- A monitor
- A mouse and keyboard
- Wireless internet
- An Amazon Web Services account
- An account with Fitbit
- A tablet for the user interface
- A Google account to get an app for the tablet
QT has two ports: one USB-C and one USB-A. You’ll need to use the USB-C port for display and figure out how to control a mouse and keyboard. I suggest a USB-C hub that has a display port that you can use (USB-C or HDMI, for example) and has USB-A ports for your mouse and keyboard. Alternatively, you can use a USB-A hub to connect your mouse and keyboard to QT.
Note
If you have trouble using your mouse or keyboard through a USB-C port, try flipping the USB-C input going into QT. In theory, USB-C should go both ways, but in practice, sometimes not.
Basics
Turning QT on and off
To turn on QT, just plug in power to QT and it will boot.
To turn off QT, there are two options:
- Press the button on the backside of QT, near its feet.
- Login to the head computer (see below) and do
sudo shutdown.
If you do sudo shutdown on the body computer, you only turn off the body computer—the head computer is still on.
Note
If you unplug QT to restart QT, it may mess up the boot timing of the two computers. Probably one of them takes longer because it boots in recovery mode. This screws up how the head and body computer network. You will not be able to connect to the head computer from the body computer. If this occurs, simple restart QT by pushing the button on its backside.
Accessing QT’s body computer
When you connect a monitor to QT and turn QT on, you will start on QT’s body computer.
Accessing QT’s head computer
To setup the head, you must Secure-SHell into it (SSH) from QT’s body computer. To do this
Turn on QT.
Open a terminal.
Type the following and hit return:
ssh qtrobot@192.168.100.1
Head
Turning off the default face
If you haven’t already, SSH into QT’s head computer:
ssh qtrobot@192.168.100.1
Update QT:
cd ~/robot/packages/deb
git pull
sudo dpkg -i ros-kinetic-qt-robot-interface_1.1.8-0xenial_armhf.deb
Note
If the git pull step fails, the head computer might be having trouble with it its network. You can check this with ping google.com. If there’s nothing, there is a problem with the network. To fix this, the best think we’ve found is to restart QT: sudo reboot.
Edit a configuration file to turn off QT’s default face:
Open the configuration file:
sudo nano /opt/ros/kinetic/share/qt_robot_interface/config/qtrobot-interface.yaml
Change the line that says
disable_interface: falsetodisable_interface: trueSave and exit
nanoby hitting Ctrl+x, then typing ‘y’, and then hitting Enter twice to confirm things.
Note
You can reboot to see these changes take effect, or continue on and we’ll reboot eventually.
Setting up our code
Secure-Shell (SSH) into QT’s head computer:
ssh qtrobot@192.168.100.1
Install our project’s dependencies:
git clone -b master https://github.com/robotpt/abm-setup ~/abm-setup
bash ~/abm-setup/scripts/pi_setup.bash
Increase the swap size, so we’re able to build without running out of virtual memory:
Turn off your swap memory:
sudo /sbin/dphys-swapfile swapoff
Open your swap configuration file:
sudo nano /etc/dphys-swapfile
Set CONF_SWAPFACTOR to 2 by changing the line that says
#CONF_SWAPFACTOR=2toCONF_SWAPFACTOR=2, that is by deleting the#character to uncomment the line.Save and exit
nanoby hitting Ctrl+x, then typing ‘y’, and then hitting Enter twice to confirm things.Turn the swap file back on:
sudo /sbin/dphys-swapfile swapon
Clone our repositories and build them:
Go to the source code directory in the catkin workspace:
cd ~/catkin_ws/src
Clone our repositories:
git clone -b master https://github.com/robotpt/cordial
git clone -b master https://github.com/robotpt/qt-robot
Build our workspace:
cd ~/catkin_ws
catkin_make
Note
It takes around five minutes for this command to finish. You can setup QT’s body computer at the same time as it runs, if you like.
Setup our code to run when QT’s head computer turns on.
Copy the autostart script into the correct directory:
roscp qt_robot_pi start_usc.sh /home/qtrobot/robot/autostart/
Enable the autostart script:
- Open a webbrowser on QT (e.g., Firefox) and go to http://192.168.100.1:8080/.
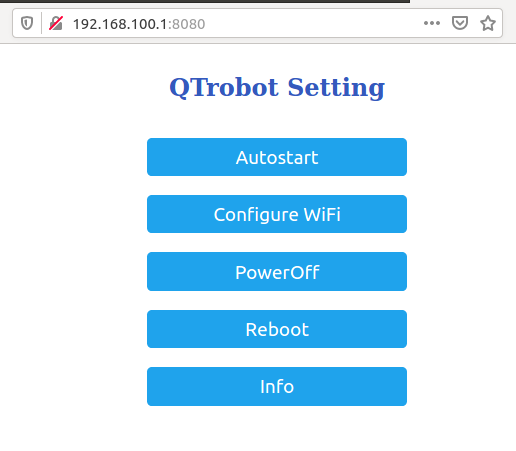
QT’s configuration menu.
- Click ‘Autostart’. You’ll be prompted for a username and password. Enter
qtrobotfor both. - Click the ‘Active’ checkbox next to
start_usc.sh.
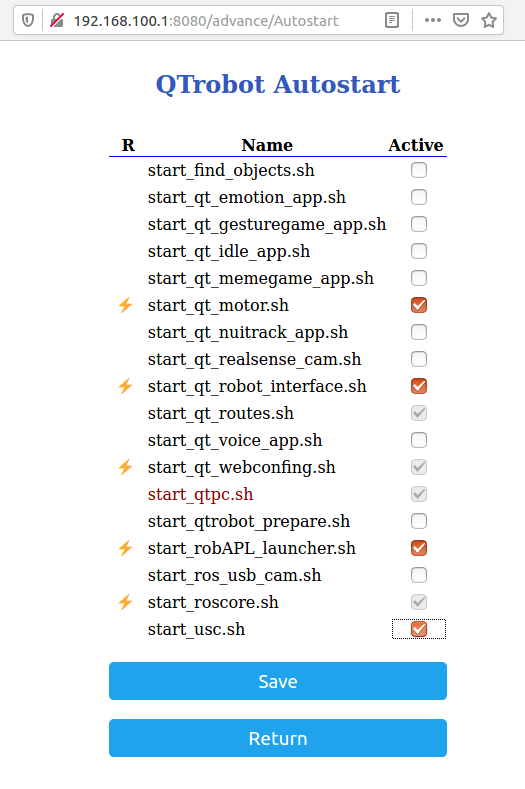
QT’s autostart menu with our script,
start_usc.sh, checked.- Click ‘Save’ and then ‘Return’ twice.
Note
You can reboot to see these changes take effect, or continue on and we’ll reboot eventually.
If you’d like, you can confirm that things are running after a reboot by opening a terminal and running the following command. You should see both /sound_listener and /start_face_server:
rosnode list | grep "/\(sound_listener\|start_face_server\)"

What you should see if the head nodes are running correctly.
Body
Getting your Amazon Web Service credentials
For QT to speak, we use Amazon Polly, which requires an Amazon Web Services account. At our current usage, using Amazon Polly is free up to a certain level), but you will need a credit card to create an account.
- Create an Amazon Web Services account.
- Once you sign in, in the top right of the page, click your account name (mine says “Audrow”), then in the drop-down menu click “My Security Credentials,” then click “Create New Access Key.”
- Record your access key and keep it somewhere safe. You can do this by downloading this or just viewing it and copy-pasting it to somewhere for later reference.
Note
It is best practice to create separate accounts with less access than your root account and use those access keys, see Amazon’s security best practices.
Setting up an Amazon Web Service bucket
For storing the recorded audio and video we’ll use an Amazon Web services S3 bucket.
Login to Amazon Web Services.
In “Find Services” type “S3” and click it when it appears.
Create your bucket:
- Hit the “Create bucket” button.
- Name your bucket and select US-West for the region. Note that the name has to be globally unique, so you may have to add some random characters to it.
- Continue through the setup process leaving things as they are set by default (no public access, etc.) and finally click “Create bucket”
Write down the bucket name you have created.
Getting your Fitbit credentials
You will need to make a Fitbit “app” for each Fitbit device. We are interested in the Client ID, Client Secret, and a generated code that saves us from having to login on a web browser.
Create a Fitbit account for each Fitbit device.
Login to your Fitbit account.
Go to register an app
Fill in the application. You can put whatever you think makes sense for most of them (URL, policy, etc.). (Make sure you include the http part int he urls.) The following are the parts that matter to get access to the Intraday data.
- “OAuth 2.0 Application Type” should be “Personal”
- “Callback URL” should be http://localhost
- “Default Access Type” should be “Read-Only”
Warning
If you get an error when trying to setup QT’s body later, come back here and make sure things are correct.
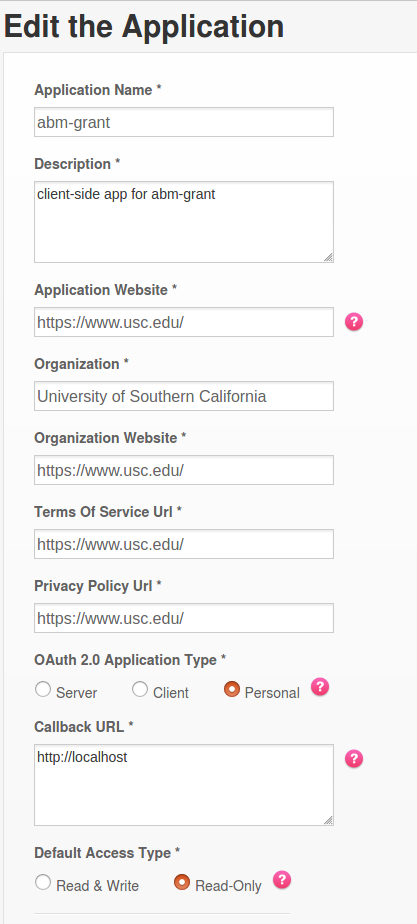
An example of what should be in the Fitbit app application
On the registered app’s page, record your Client ID and Client Secret, and then click “OAuth 2.0 tutorial page,” near the bottom.
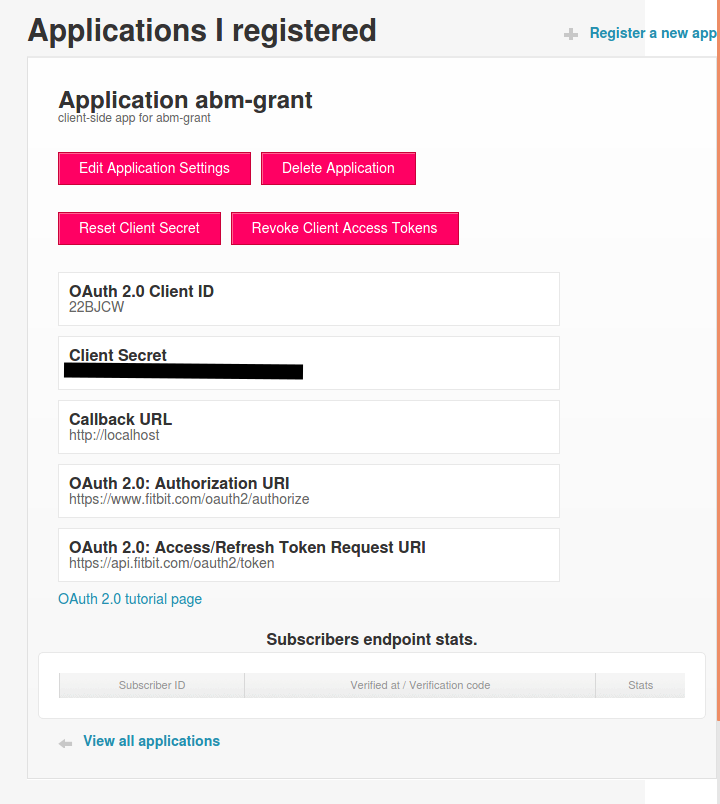
The registered app page.
On the Oauth2.0 tutorial page, set “Flow type” to “Authorization Code Flow.”
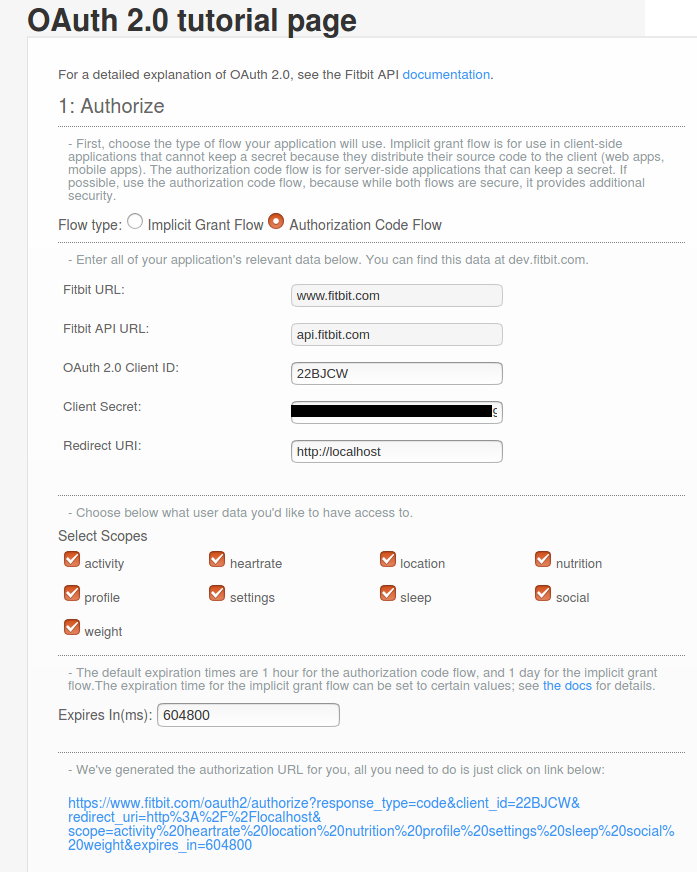
Oauth2.0 tutorial page with “Flow type” set to “Authorization Code Flow.”
Note
The “Expires In(ms)” text field is only used for “Implicit Grant Flow.” “Authorization Code Flow,” what we are using, expires in a fixed time (8 hours), but we are able to renew our authorization.
Click the URL above “1A Get Code.” You’ll be brought to an error page, but that’s okay. We need the code from the URL. Record that code.
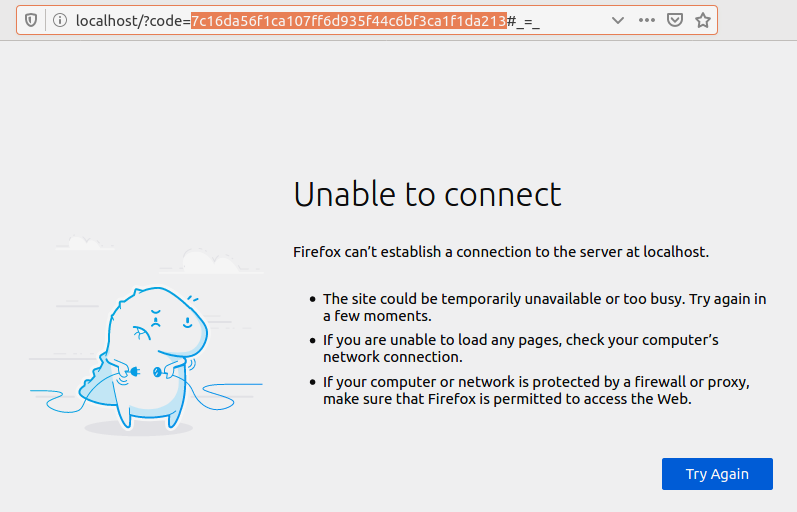
The page that you arrive at when clicking the URL above “1A Get Code.” The code we are interested in in the URL is highlighted.
Warning
If the URL is longer than in the picture, go back to the OAuth2.0 tutorial page and make sure that you have the “Flow type” set to “Authorization Code Flow,” not “Implicit Grant Flow.”
Note
The code obtained in this step only works once. After you use it to initialize a Fitbit client, it cannot be used again. We use it to obtain an access and refresh token for talking to Fitbit’s web API. If you need to reset Fitbit credentials for any reason, you will have to go to the OAuth2.0 tutorial page and get a new code.
Note
From this section, you should have the following information:
- Client ID
- Client Secret
- A generated code
Setting up our interaction
Change your system timezone to be in your current timezone. To do this, you can click the time in the upper-right of the desktop on QT and then click ‘Time & Date settings…’
Open a terminal and clone this repository onto QT’s body computer:
git clone -b master https://github.com/robotpt/abm-setup ~/abm-setup
Run a script to allow for updates:
sudo bash ~/abm-setup/scripts/nuc_setup.bash
Warning
If this step fails, try the following commands before rerunning:
sudo apt install --reinstall python3-six
sudo apt install --reinstall python3-chardet
Note
This step takes five minutes or so.
Setup Docker:
Install Docker:
curl -fsSL https://get.docker.com -o get-docker.sh
sh get-docker.sh
Set Docker to run without
sudo:sudo groupadd docker sudo gpasswd -a $USER docker newgrp docker
Test that Docker is installed correctly and works without
sudo:docker run hello-world
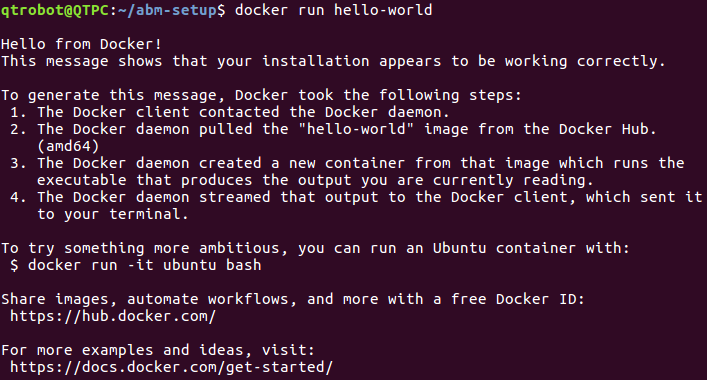
What is printed from running the
hello-worlddocker container.Setup Docker-compose:
Install Docker-compose:
sudo curl -L "https://github.com/docker/compose/releases/download/1.25.3/docker-compose-$(uname -s)-$(uname -m)" -o /usr/local/bin/docker-compose
sudo chmod +x /usr/local/bin/docker-compose
Check that docker compose is installed correctly:
docker-compose version
Setup the docker container:
Note
The first time that you run the Docker script, it will take around 15 minutes to setup the container. After that, it will be fast. Feel free to take a break or go get coffee :-)
Open the
Dockerfilewithnano ~/abm-setup/docker/Dockerfileand replace the name of the Amazon Web Services bucket. The line to change is at the bottom of the file and should be changed toENV AWS_BUCKET_NAME <your aws bucket's name>with whatever your bucket is named, for example,ENV AWS_BUCKET_NAME qt-robot-1.Run the
docker.shscript with thesetupoption:bash ~/abm-setup/docker/docker.sh setup
Note
I did have an error occur during this command one of the times I was setting it up. It might have been a network issue. I ran it again and it succeeded. If you have trouble here let me know.
Enter your Fitbit and Amazon Web Services credentials as prompted. The following is the order they are asked in and what they look like / should be:
Prompt Example / value Fitbit Client ID 22XXXXFitbit Client Secret 5912f5907faa693e3e6630XXXXXXXXXXFitbit Ultra Secret Code 6e843fa2b908b1f608b973b845b793XXXXXXXXXXAWS Access Key ID AKIAY2SYU4XXXXXXXXXXAWS Secret Access Key jwY9mv9U7DBfZe2/p5XXXXXXXXXXXXXXXXXXXXXXAWS Default Region Name us-west-1AWS Default Output Format jsonWarning
If you receive an error after entering the Fitbit information, check that you have a device setup with the Fitbit account.
Ignore the network information displayed and hit Ctrl+C to close the container.
Run the interaction:
Make sure that you’re in the
dockerdirectory in theabm-setupfolder:cd ~/abm-setup/docker
Run the
docker.shscript with therunoption:bash docker.sh run
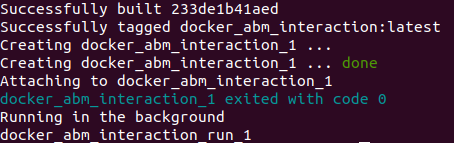
An example of the final message after the interaction run script.
Make the interaction run on startup:
List your Docker containers:
docker container ls

An example of running containers.
Copy the “CONTAINER ID”.
Update the container’s restart policy:
docker container update --restart=unless-stopped <YOUR COPIED CONTAINER ID>
Note
At this point, you should reboot QT. You can do this by either pushing the button on the back of QT or typing sudo reboot into the head computer’s terminal.
To test that things are setup correctly, you can take the URL for the GUI that you wrote down and type it into the web-browser on any device that’s on the same network. QT should begin asking you about your name, if it is your first interaction.
Setting up remote access to QT
Get Dataplicity login credentials from Audrow and sign on. Go to the devices tab and then click “+ Add New Device”. Copy or enter this command into a terminal on QT’s body PC and enter QT’s password ‘qtrobot’. After that runs, remote access should be setup. You can confirm this by clicking the added device and confirming that you can explore the file system (e.g., ls /home/qtrobot and you should see familiar directories such as abm-setup).
Tablet
For either tablet supplied by LuxAI with QT, or any Android tablet for that matter, we’re going to set up the tablet to run as a Kiosk using the app Fully Kiosk Browser.
Sign on to the Google Play Store.
Search for and download Fully Kiosk Browser.
Go to settings and connect to QT’s network, for example,
QT145. The password should be11111111(eight ones).Start Fully Kiosk browser and set the start URL
192.168.100.2:8082/index_only_user_input.html. This URL will only show the parts of the GUI for user input. If you want to see the text the robot speaks, use the following web address:192.168.100.2:8082.Adjust settings in Fully Kiosk browser:
- In ‘Settings > Web Zoom and Scaling’, disable ‘Enable Zoom’
- In ‘Settings > Web Auto Reload’, set ‘Auto Reload after Page Error’ to ‘2’.
With this app, you can make it so that it’s challenging to get out of the app or do other things on the tablet. You can go into ‘Settings > Kiosk Mode (PLUS)’ to play with these settings. A plus license is 6.90 EUR per device (about 7.50 USD).
Reseting QT
Full reset
If you would like to delete the data stored on QT, as well as reset the Fitbit and AWS credentials, enter the following commands from QT’s body computer:
cd ~/abm-setup/docker
docker-compose down -v
Reset Fitbit Credentials and/or interaction history
I will seek to make this easier for the full deployment, but for now, do the following:
Open a terminal to the Docker environment:
bash ~/abm-setup/docker/docker.sh debug
Remove what you’d like:
Remove the Fitbit credentials document from the terminal that pops up:
rm /root/state/fitbit_credentials.yaml
Remove the interaction history to start again from QT introducing itself and setting up the interaction:
rm /root/state/state_db.pkl
Exit the Docker terminal (you can just close it).
To setup your Fitbit credentials, in your original terminal, run the setup script again:
bash ~/abm-setup/docker/docker.sh setup
Note
The Amazon Web Services credentials will show that they have values with the values in brackets (e.g., [XX..XXJUXB]). You can just hit Enter to leave these values unchanged.